
The mystery gift

Have you ever received a gift in a wrapped box and shaken the box to try to guess what may be inside? How would you feel if you could shake the box and measure the box, but you never got to open the box? What if you had to do your best to determine what was in the box and just appreciate it without unwrapping it?
Now imagine what it might be like if the box were incredibly small and what was inside even smaller. Since an atom is too small to be photographed, this was essentially the task undertaken by scientists of the 1800s and early 1900s who studied the atom.
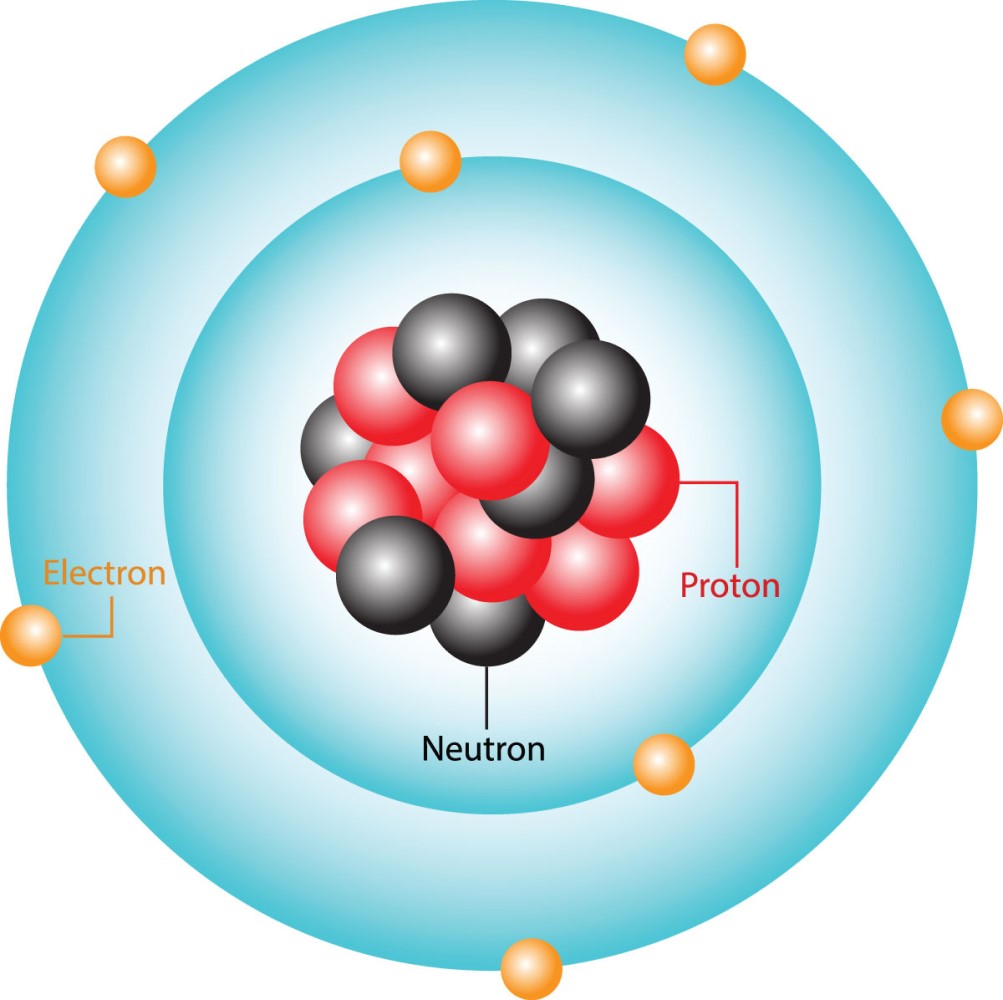
You may have come across diagrams of an atom that are similar to the following diagram presented. What discoveries were made in previous centuries that allow us today to draw an atom as shown in the following diagram?
Scientists studying the atom sought to determine the structure and behaviour of something too small for them to actually observe. Nobody knew the right answer to their questions, so they could only do their best to figure out what was happening on the atomic scale of matter. The collective achievements that uncovered the structure of the atom remain one of the major accomplishments of all science.

Development of the Atomic model
The smallest unit of matter is the atom, just as the smallest meaningful unit of a sentence is a word. A word is made of letters. What is an atom made of? How is an atom organized internally?
Philosophers and scientists have wondered about this for centuries.
We will examine seven major “pieces of the puzzle”, or things that played a role in the development of the atomic model. You will be placed into groups, selected by your teacher, to conduct research into various scientists that have contributed to the atomic model theory as many of these scientists have made other contributions in other areas of science. Use the “Scientists and the development of the Atomic theory” (Opens in new window) to record your research notes. You will place your responses in the following discussion board.
Join the discussion
With your group members, research the Atomic theory and your assigned scientist. Post your research in your assigned discussion thread. The seven major pieces of the puzzle are:
- The Ancient Greeks 490-460 BC
- John Dalton 1803
- J.J Thompson 1893
- Hantaro Nagaoka 1903
- Earnest Rutherford 1911
- Neils Bohr 1911
- James Chadwick 1935
Notebook

In your notebook, use the information from the discussion board to create a flowchart that describes what each major advancement in atomic theory contributed to our current understanding of the atom.
The Bohr model of the atom
The main flaw in Rutherford’s model of the atom was the unorganized view of the electrons spinning around the nucleus. Due to encounters with other electrons and a generally circular path, electrons cannot travel in a straight line. As an object changes speed and direction it also decelerates. An electron circling the nucleus is constantly changing direction and therefore decelerating. According to this theory, the negative electron should eventually move so slowly that it succumbs to the positive nucleus and the atom should consume its electrons and collapse into a “naked” nucleus. Yet most atoms do have electrons, so this must not be the case.
Notebook
In your notebook, create a Venn diagram which is used to show the similarities between Rutherford’s model and Bohr’s model of the atom. For example, your diagram could be similar to the one in the suggested answer:

The electromagnetic spectrum
Before you learn more about how Bohr added to Rutherford’s view of the atom, you need to know about the electromagnetic spectrum.
The electromagnetic spectrum puts all the types of radiation in order based on their wavelength

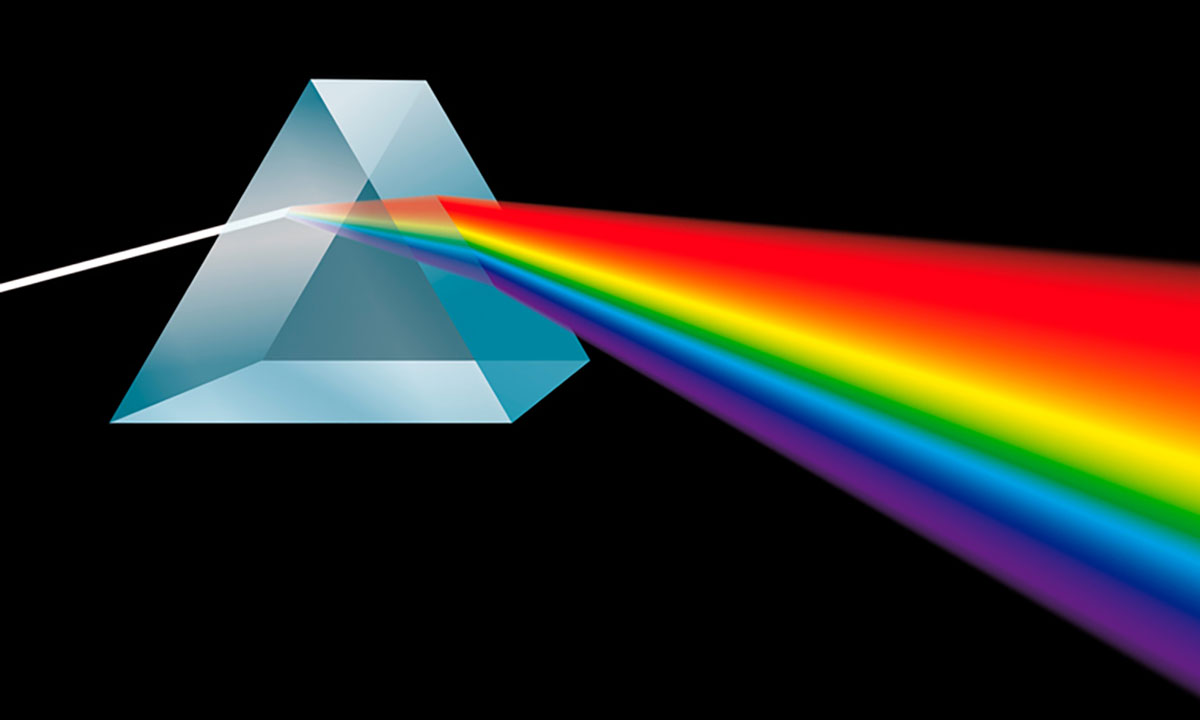
One kind of electromagnetic energy, visible light, is the light most humans see and use every day. Other types of electromagnetic energy include radio waves, infrared light, ultraviolet light, X-rays, and microwaves. The visible spectrum is the colours viewed when sunlight is passed through a prism, as demonstrated in the following image. You have encountered this spectrum after a rainfall as a rainbow. This type of spectrum is called continuous since all the different colours blur together in an uninterrupted sequence: red, orange, yellow, green, blue, and violet.
If instead of sunlight you observe light emitted by a heated sample of a pure element, you will notice a distinctive pattern of lines, as in the following images. You can determine from the images that each spectrum has a different pattern of lines specific to the element in the sample.
The diagram illustrates, a tube filled with gaseous hydrogen is provided with a source of electrical energy, and lights up as a result. Slits are used to focus the light source before it is passed through a glass prism. The hydrogen light is dispersed as a result. The dispersed light is called an emission spectrum.
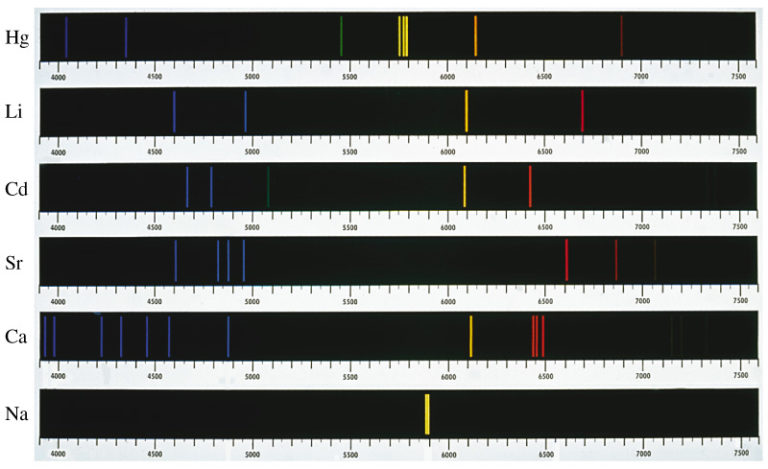
The diagram illustrates, the emission line spectra for mercury (Hg), lithium (Li), cadmium (Cd), strontium (Sr), calcium (Ca), and sodium (Na). Each element produces a distinctive pattern of lines that can be used to determine the presence of the element in a sample.
Each element has its own distinct spectrum. You can use the distinct pattern of lines to determine which element is present in a sample as long as the sample is a pure element.
To view the different emission spectra of different elements, use the following interactive periodic table. The emission spectrum of any element you select is shown at the top of the interactive periodic table.

For this course, you may also wish to download and/or have a copy of the periodic table (Opens in new window).
For many years prior to Rutherford, scientists knew that each element produced distinctive emission spectra but they were unable to explain this phenomenon. It was eventually explained when Niels Bohr combined his knowledge of physics with Rutherford’s conclusions from the gold foil experiment.
Explore this!

Explore the following video, which summarizes how light is emitted from or absorbed by an atom. It also explains how electrons moving in the atom are the source of each element's emission spectrum. The term photon is used throughout the video, which means this is the basic unit of light energy, which is the smallest discrete amount of electromagnetic radiation.
Using qualitative analysis
Earlier you learned that every element, when heated or “excited,” will produce a distinctive emission line spectrum. The element’s spectrum can be used to determine if that element is present in a sample. This spectrum is based on the idea that when electrons in an atom are excited, they move from a lower energy orbit level to a higher energy orbit level. When the electron drops back to its original energy orbit (called the ‘ground state’), the atom releases energy in the form of light.

These fireworks are orange because of the sodium that is present in the fireworks when they go off.
When various types of matter are burned at high temperatures, they produce flames of different colours. You can use a qualitative analysis technique called a flame test to help determine the presence of a particular metal in an unknown sample by exposing that sample to high temperatures.
Since different metals produce different colours, you can match the known colour that the metal produces to the colour that the unknown sample produces and determine its identity.
| Metal | Symbol | Colour |
|---|---|---|
| Calcium | Ca | Red-orange |
| Copper | Cu | Blue-green |
| Lead | Pb | Pale blue-gray |
| Lithium | Li | Red |
| Potassium | K | Violet |
| Sodium | Na | Yellow |
Flame test activity
The following describes the process and results of flame testing for different elements. Notice how each element produces a different colour when exposed to the flame.
Flame tests
Introduction
When elements burn, they produce a distinctive spectrum of colours. In a flame test, the colours produced by burning an unknown substance are compared to the colours produced by burning known substances. This analysis can help determine the presence of a particular metal in an unknown sample.
What to do
Each of the sample metals have a characteristic colour spectrum when burned. Press the following tabs to observe the unique colours produced by each element as a sample of each metal is burned on the flame.
Sample metals: Sodium, Calcium, Lead, Potassium, Copper, Lithium


Lab activity
Unknown element investigation
Now it is time to put your qualitative and quantitative analysis skills to the test along with your understanding of the structure of the atom. Using the results and the following table as well as information found from your own research, you will practice identifying substances based on their properties. This will be guided-inquiry lab activity. You will have the chance to try to identify the unknown substances. You will produce a lab report based on the procedure and results from this activity using the following model lab report. Your teacher may collect this report for some feedback.
Instructions for unknown element investigation:
You will produce a lab report based on the procedure and results from this activity using the following model lab report. You may choose to download and/or make a copy of model lab report(Opens in new window).
Use this eight-section lab report to model your lab report work. Press the following tabs to access a detailed description of the sections of a lab report.
The title of a laboratory report is a short, informative statement explaining what the laboratory report is about.
For example: a title could be “Identifying elements”.
This is a short statement, or paragraph, explaining the reason for conducting the experiment.
For example: The goal of my experiment is to determine if it is possible to identify elements based on their properties.
A hypothesis is an educated guess that predicts the result of the experiment you will be conducting. It is written in the form of a prediction.
For example: Elements can be identified based on their density, flame colour, boiling point and freezing point.
This is a list of all materials used in the experiment. Diagrams can also be used in this section to show how the experiment was set up.
In my experiment I used:
- Samples of elements in test tubes
- Scale
- Beaker of water (to test density)
- Bunsen burner
- Thermometer
- Retort stand
- Safety goggles, gloves and apron
The method is an ordered list of steps clearly describing how the experiment was done. They are written in the past tense and can be written in the third person, as shown, or they can be written in the first person.
For each sample:
- Weigh it using the scale.
- Determine the volume of the sample.
- Calculate density using the mass and volume.
- Conduct a flame test using the Bunsen burner and sample of element.
- Determine the melting point by putting the thermometer into the sample and holding it over a Bunsen burner until the sample melts.
- Determine the boiling point by putting the thermometer into the sample and holding it over a Bunsen burner until the sample boils.
- Record each value in the observation table.
- Compare your observations to the data already known about elements.
- Identify each element based on their properties and record this in your table.
This section tells the reader what the experimenter observed before, during, and after the experiment. It is usually organized into sections, including diagrams, tables and graphs. The results may be in quantitative (involving numbers) or qualitative form (not involving numbers). All quantitative information recorded must include units of measurement, such as grams (g), metres (m), or degrees Celsius (°C).
For example:
| Mystery element | Density | Flame colour | Melting point | Boiling point |
|---|---|---|---|---|
| 1 | ||||
| 2 | ||||
| 3 | ||||
| 4 | ||||
| 5 | ||||
| 6 | ||||
| 7 | ||||
| 8 |
This is the section where you can include any calculations you had performed and discuss your results in detail.
For example: In comparing the mystery element properties to the properties of known elements, I was able to determine that the following samples were these elements.
| Mystery sample | Element identification |
|---|---|
| 1 | |
| 2 | |
| 3 | |
| 4 | |
| 5 | |
| 6 | |
| 7 | |
| 8 |
The conclusion section is related to the original purpose and hypothesis. Do the results of your experiment support your hypothesis? If so, it is important to state this. If they do not, you could pose some questions based on your results that could guide a follow-up experiment.
A conclusion should also suggest some sources of error, even if your experiment worked well. If another individual conducts your experiment, they can take note of your sources of error and ensure that they design it so that they can take these into account.
For example: The hypothesis was correct. I was successful at identifying elements by measuring and observing their properties and then comparing them to those of known elements.
Unknown element investigation
All elements have certain distinct properties, such as the colour of flame that is produced in a flame test, the temperature at which it boils, its density or the temperature at which it melts, among others. These distinct properties can be used to identify unknown elements in an experimental setting.
Explore this!
The following video is a lab demonstration of identifying elements based on the flame test. When viewing the video make note of the lab equipment and methods used in performing this lab.
Research the following elements and complete the following table in your notebook, you will use this information to help you determine an unknown element based on some experimental results.
| Element | Melting point | Boiling point | Flame test result | Density |
|---|---|---|---|---|
| Potassium | ||||
| Sodium | ||||
| Lithium | ||||
| Calcium |
Now for the experimental lab results. A set of experiments was performed on 3 unknown elements, using the results of your research, use the following experimental results to identify the unknown elements. You may write up a lab report based on the results and your analysis, your teacher may use this as an assessment opportunity.
Mystery element A - Experimental results:
Boiling point: >1,000° C
Melting point: <200° C
Density: <0.61 g/cm3

Mystery element B - Experimental results:
Boiling point: >800° C
Melting point: <100
Density: <0.100 g/cm3

Mystery element C - Experimental results:
Boiling point: >700° C
Melting point: <100° C
Density: >0.80 g/cm3

Portfolio
You may submit your lab report based on the results and your analysis to your teacher
The Bohr Rutherford model of the atom
The Bohr model of the atom is really just an improvement on the Rutherford model and so it is referred to as the Bohr-Rutherford model of the atom.
Although at the time Bohr’s model seemed to explain quite well the phenomenon of the emission spectrum, it actually held true only for elements that possess one electron—in other words, hydrogen and certain ions. Nevertheless, his idea of orbits allowed him to predict the maximum number of electrons each orbit could hold. It was predicted the maximum of the first orbit as 2, the maximum of the second orbit as 8, and the third orbit being stable with 8.

Bohr-Rutherford diagram of Hydrogen. Notice how the number of protons and neutrons are indicated within the nucleus. Also notice how the standard notation of the hydrogen atom is provided on the bottom right corner of the image (you will learn more about this later in the learning activity.)

Bohr-Rutherford diagram of Lithium. Since lithium has three electrons, the first two electrons are placed in the first orbit. Once the first orbit is full, the third and final electron is placed in the second orbit

Bohr-Rutherford diagram of Nitrogen. When placing electrons in the second and third orbit of an atom, the first electron is placed at the top of the orbit, the second at the ‘three o’clock position’, the third at the ‘six o’clock position’, and the fourth at the ‘nine o’clock position’. Subsequent electrons are placed in the same fashion, but as pairs. Notice how the fifth electron in the second orbit of nitrogen has been added as a pair for nitrogen.

Bohr-Rutherford diagram of Sodium. Make note of how the eight electrons in the second orbit of nitrogen are all paired. With the first and second orbit of sodium now full, but eleventh and final electron of sodium is then placed on the third orbit at the top of the orbit.
Example
Draw Bohr-Rutherford diagrams for Helium (2 protons, 2 neutrons, and 2 electrons).

Draw Bohr-Rutherford diagrams for Oxygen (8 protons, 8 neutrons, and 8 electrons).

Draw Bohr-Rutherford diagrams for Chlorine (17 protons, 17 electrons, and 18 neutrons).

The periodic table of elements
Earlier in this learning activity you were asked to investigate the interactive periodic table provided in this course. Explore the following interactive again and examine the Bohr-Rutherford diagrams for the elements.

You will probably notice that you have already encountered some of the elements, such as iron (Fe), gold (Au), and iodine (I). There are many others with more obscure names, such as ytterbium (Yb) and hafnium (Hf).
A pure sample of an element contains one type of atom and all of these atoms have the same number of protons. At the time that this course was written, chemists have discovered 118 elements, which are arranged on the periodic table by their atomic number. The atomic number of an element is equal to the number of protons in one of its atoms. An element’s atomic number is like a person’s fingerprint—every person has a distinctive fingerprint and every element has a certain atomic number.
For instance, only fluorine has the atomic number of 9. This is the number of protons in the atom. It also represents the number of electrons in a typical “stable” nitrogen atom.
An atom’s mass number is the sum of the mass of its protons and neutrons. A stable fluorine atom has a mass of 19, which is 9 protons and 10 neutrons.

Try it!

For each of the following questions, select the correct answer from the options provided. Then press Submit to check your understanding.
Isotopes
An isotope of nitrogen is an atom with a different number of neutrons than a typical stable nitrogen atom.
Isotopes are atoms that are the same element but have different masses because they have different number of neutrons.
Nitrogen-14
Protons: 7
Neutrons: 7

Nitrogen-15
Protons: 7
Neutrons: 8

Nitrogen-16
Protons: 7
Neutrons: 9

A change in the number of neutrons has no effect on the atomic number, but it changes the mass number. This is because the atomic number represents the number of protons that the atoms has.
An element’s average atomic mass is listed on the periodic table. This value represents the average of all the naturally occurring isotopes of an element. The mass number for nitrogen is listed as 14.0067. This means that in an average sample of nitrogen there are 7.0067 neutrons for every 7 protons. The decimal value indicates that a sample of nitrogen is actually made up of some atoms that have more or less than 7 neutrons. The mass number listed on the periodic table is an average of all the different forms of nitrogen. Rounding the average mass number provides the mass number of nitrogen, which is 14. For instance, nitrogen-14 is the most common atom in a sample, but a bit of nitrogen-15 also exists. (Note: In the naming of isotopes, a hyphen precedes the mass number when the isotope name is written.) Since the atomic number never changes for nitrogen, the number of protons remains 7 in all isotopes of nitrogen. Therefore, nitrogen-15 has 8 neutrons, one more than the typical nitrogen atom.
Standard atomic notation
In addition to various numbers of neutrons, atoms can also possess electrons in greater or lesser quantities. The most stable kind of atom is one that is electrically neutral, meaning it possesses equal numbers of protons and electrons, which results in a net charge of zero. If an atom possesses more or fewer electrons than it does protons, it is called an ion and is no longer electrically neutral.
An ion is made by adding or removing electrons from an atom.
All of this information can easily be denoted using standard atomic notation. You have actually encountered this already. In general terms, the standard atomic notation for an element is as follows:
Where Z is the mass number
A is the atomic number
X is the symbol for the element
The following is an example of the standard atomic notation for nitrogen:
Where 14 is the mass number
7 is the atomic number
N is the symbol for the element
The following is an example of the standard atomic notation for a fluorine ion with an extra electron:
Where 19 is the mass number
9 is the atomic number
F is the symbol for the element
The square brackets indicate it is an ion, and the superscript “–1” indicates that one extra electron (a negative charge) is present.
The following is an example of the calcium ion with two electrons removed:
Notebook
Example 1
It may be helpful to refer to the periodic table of elements (Opens in a new window). In your notebook, write the standard atomic notation for the following elements. Press the following tabs to access the suggested answers and check your understanding.
From the periodic table, it is evident that an atom of magnesium possesses 12 protons. Its atomic number is 12. The mass number from the periodic table is 24.305, which can be rounded to 24. The standard atomic notation for magnesium is therefore:
From the periodic table, it is evident that the oxygen ion has an atomic number of 8. The mass number is 15.99, or rounded is 16. Since you are writing the standard atomic notation of the ion, you must recall how many extra electrons the oxygen ion possesses. You are told in the question that this oxygen ion possesses two added electrons. With this information, the standard atomic notation becomes: Use the square brackets and the –2 to indicate that this element is an ion.
From the periodic table, it is evident that phosphorus has an atomic number of 15. You are told in the question to write the atomic notation for phosphorus-33. Therefore the standard atomic notation is:
You are told in the question that this iron ion possesses two fewer electrons. With this information, the standard atomic notation becomes:
Assessment Opportunity
The following fillable and printable document called “Parts of an Atom Worksheet - blank” (Opens in a new window) is provided for your practice. You may print it out or copy it into your notebook. Your teacher may collect it for evaluation or feedback.
As you complete the activity, recall the following:
- You need to determine the number of protons, neutrons, and electrons.
- Recall how electrons are filled in each shell: the first one can hold two electrons, the next can hold eight, and the third one can hold eight.
When you are ready, submit your assessment by pressing the “Submit Your Work” button and follow the submission directions.
Videos
Press the following tabs to access instructional videos which provide further information about how to complete the table and draw the Bohr-Rutherford diagrams for the previous activity.
Explore the following video which describes how to complete the table and draw the Bohr-Rutherford diagram for beryllium.
Explore the following video which describes how to complete the table and draw the Bohr-Rutherford diagram for carbon.
Explore the following video which describes how to complete the table and draw the Bohr-Rutherford diagram for hydrogen-2.
Explore the following video which describes how to complete the table and draw the Bohr-Rutherford diagram for lithium.
Explore the following video which describes how to complete the table and draw the Bohr-Rutherford diagram for neon.
Explore the following video which describes how to complete the table and draw the Bohr-Rutherford diagram for nitrogen.
Explore the following video which describes how to complete the table and draw the Bohr-Rutherford diagram for oxygen.
Explore the following video which describes how to complete the table and draw the Bohr-Rutherford diagram for phosphorus-3.
Explore the following video which describes how to complete the table and draw the Bohr-Rutherford diagram for sodium.
Explore the following video which describes how to complete the table and draw the Bohr-Rutherford diagram for sodium+1.
Explore the following video which describes how to complete the table and draw the Bohr-Rutherford diagram for sulfur-2.
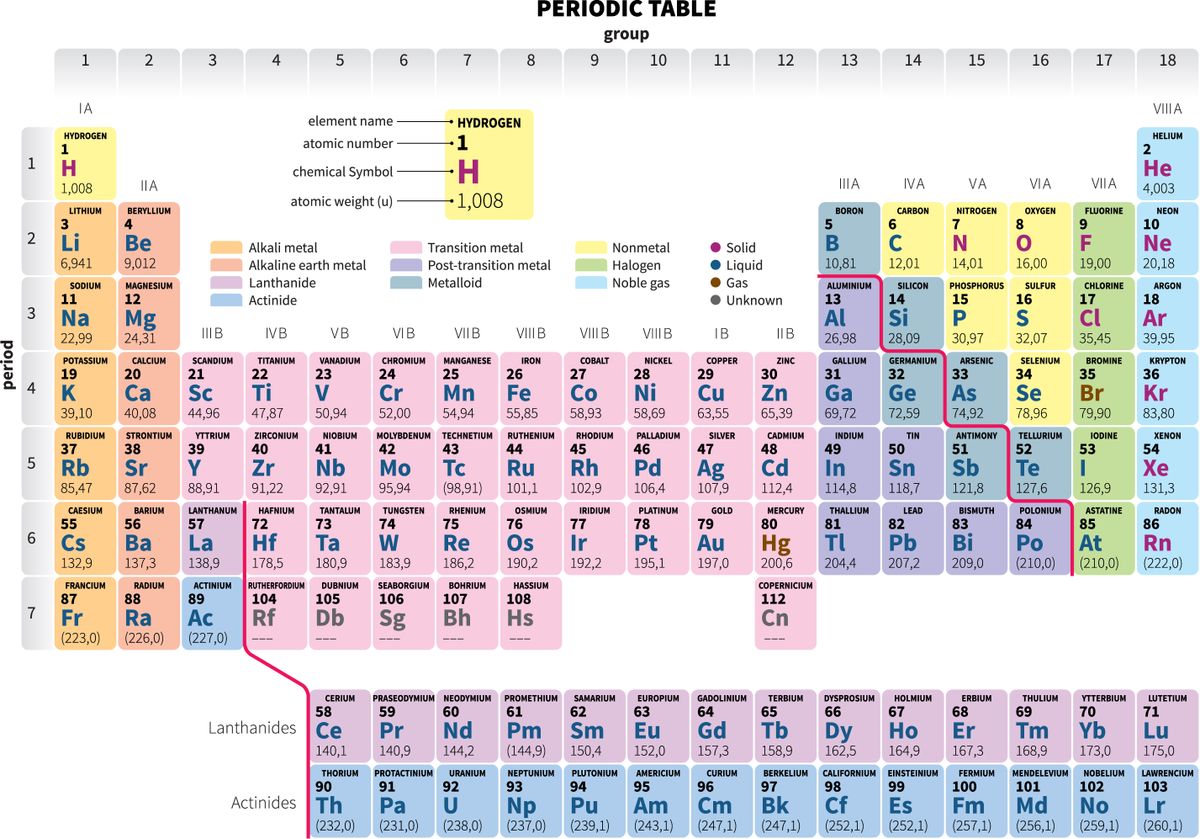
The organization of the periodic table of the elements
Here is a periodic table of the elements. (Opens in a new window)
The periodic table is mainly arranged in rows, from left to right, in order of increasing number of protons. Some interesting patterns can be noted when you study the various columns (families or groups) of elements. You may recall from previous science courses that the rows are called periods and the columns are called families. The representation of the periodic table used for this course demonstrates the periods and families.
Family 1A is called the alkali metals, family 2A is called the alkaline earth metals, the block from family 3B to 2B is called the transition elements, family 7A is called the halogens and family 8A is called the noble gases. (Note: You do not need to memorize the table for this course as one will always be provided to you.)
Notebook
Example 2
Use the periodic table of the elements to answer the following questions:
- Determine the symbol for the element with 13 protons.
- Determine the symbol for the element in the fifth period that is a halogen.
- Determine the symbol for the noble gas located in the third period.
- An element with three protons.
- A noble gas in the second period.

In the Minds On section of this learning activity, you were asked to imagine that you had a box and didn’t know what was inside of it. Now, that you have studied the atom in more detail it is time to consolidate your knowledge.
Using the following interactive PhET simulation, press the blue Game component with the happy face.
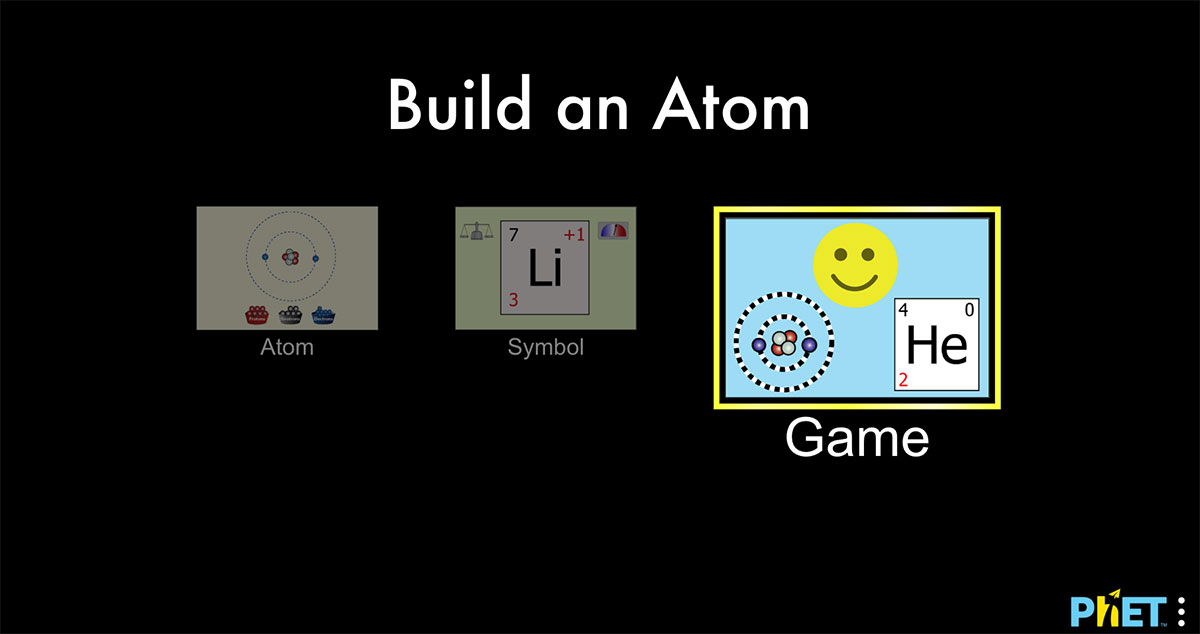
Using this interactive PhET simulation, access the game component on the right.
From there, select the periodic table game on the left.
Make sure that you have a periodic table (Opens in a new window) open or a printed copy beside you before playing this game. Using the information given to you (either information from the periodic table or a diagram of an atom), practice figuring out which element it is and if it is a neutral atom or not.
Notebook
When you are finished playing the game and are able to accurately determine the elements, consider the following questions. These questions are to help you reflect on your learning. Record your answers in your notebook.
- What characteristics do you know about atoms?
- How has your understanding of the atom changed since the Minds on activity?
- If you knew that an atom was hidden inside a box and you had to guess which atom it was by asking questions, which questions would you ask?
Join the discussion
After answering the questions in your notebook, post your answers in the discussion board. The class will review the main points of these questions together. Reply to your peers to compare the similarities and differences in your answers.
Opinion matters - Should fireworks be banned?
You've now encountered how different elements can produce specific colours when burned. This application of this scientific rule is used in the production of colourful fireworks. You will now combine this information with the results of some research to articulate an opinion on whether fireworks should be banned or continue to be sold to the public.
| Research | Writing | Citing references |
|---|---|---|
|
To help you with the various phases of completing academic research, here are some resources that you may choose to explore. You do not have to use them but they could help. |
Initial basic research
Spend a few minutes researching how fireworks work. You will NOT be submitting this report for feedback. It is for practice only.
Notebook
In your notebook make rough notes on the following:
- What makes fireworks launch into the sky?
- What are they packaged in?
- What metal or metal salts are used? What is their purpose?
Articles - Should fireworks be banned?
Now, research at least two websites or articles related to fireworks and their impact on the environment to help inform your opinion.
Evaluating sources of information
Use the following table to learn about the questions you can ask yourself about websites to help you evaluate the sources of information.
| Criteria | Explanation | Questions to Pose |
|---|---|---|
| Authority |
Authority considers WHO (or what) created the source and the reputation and background of authors or organizations who produce the information, and the degree to which the authors or organizations are accepted experts in the field. |
|
| Currency |
Currency is WHEN the source was created. Usually it is important to consider the most recent findings on a topic or issue; however, there may be a need to access sources from a particular time period. |
|
| Integrity |
Integrity relates to WHY the source was created and HOW evident these reasons or intentions are apparent to users of the information. |
|
| Relevance |
Relevance is HOW practical or applicable the information is to the research. |
|
| Validity |
Validity is WHERE the author gets the information and HOW accurate the information is and HOW well it is supported. |
|
*adapted from Purdue OWL; SPARK at York University
Notebook
You should put notes about each of the five criteria for evaluating sources of information into your notebook for future reference.
Now, copy and complete the following table in your notebook as you evaluate the sources of the two articles.
| Consideration | Website 1 | Website 2 |
|---|---|---|
| Authority | ||
| Currency | ||
| Integrity | ||
| Relevance | ||
| Validity |
Notebook
Six hats process
Now that you have read and evaluated both websites, complete the following six hats activity in your notebook to evaluate whether or not you think that fireworks should be banned.
While you complete any additional research you might need and review the articles again, complete the “six hats” activity where you consider the issue from six different perspectives (as if you were taking a different role or perspective with each color hat). Make notes in your notebook under each colour hat to help you explore the issue from a variety of perspectives.
- White hat. In this space, make point form notes on the facts. Only facts, no opinions.
- Yellow hat. In this space, make notes from a perspective of positiveness or optimism around this issue.
- Black hat. In this space, make notes from a perspective of the negative, or the devil’s advocate (against). What might go wrong? The downsides?
- Red hat. In this space, make notes about your own feelings, instincts and ideas.
- Green hat. This is the space to be creative. Are there other options? Creative solutions? Any new ideas you may have?
- Blue hat. This is the perspective of monitoring the process. Do your best to ensure that you have taken the 5 different perspectives. Review your previous notes. Reflect in this section - did you consider the issue from the different perspectives? Could you have improved your process at all?
Notebook
Communicate your opinion
After completing this activity and evaluating the facts, do you think that fireworks should be banned? Write approximately 1-2 pages in your notebook summarizing what you have learned about the various perspectives and state your opinion on the matter. Be sure to include supporting information as to why you came to that conclusion on the issue.
This a self-assessment, please review the following success criteria checklist to ensure that your opinion piece contains each required item on the success criteria checklist.
After you write your opinion piece, include a list of sources of information in APA format.
Success criteria checklist
- Research sources have been listed using APA format.
- Correct terminology is used.
- Paragraphs are organized.
- Various perspectives on the issue are stated.
- Opinion is stated with supporting information.
- The information is presented in a logical and organized manner.
- Written using proper sentence format with correct grammar and spelling.
- Connection made to the chemistry concepts in this course so far have been stated (ex. emission spectrum, ions).
- Impact of chemicals on the environment has been explained.
Reflection
Review the learning goals and success criteria for this learning activity. Revisit any areas where you need to strengthen your understand.
Now that you have completed the learning activity, reflect on the following success criteria, and make note of your responses in your notebook.