Moving from reality to surreality
So far, you have encountered various techniques used in creating self-portraits, whether realistic or not. Artists can add another layer of meaning by incorporating ideas, symbols, and images collected from dreams to create surreal portraits. You recorded some images from your own dreams as possible inspiration for artworks.
You will now turn your attention to examples of student self-portraits that incorporate both realistic and surreal elements.
The creative challenge will be to create a surreal pencil crayon or digital self-portrait to express 1-2 aspects of your identity. Your portrait should incorporate surrealistic imagery and the image should communicate a message about your identity to the viewer of the work by incorporating symbols.
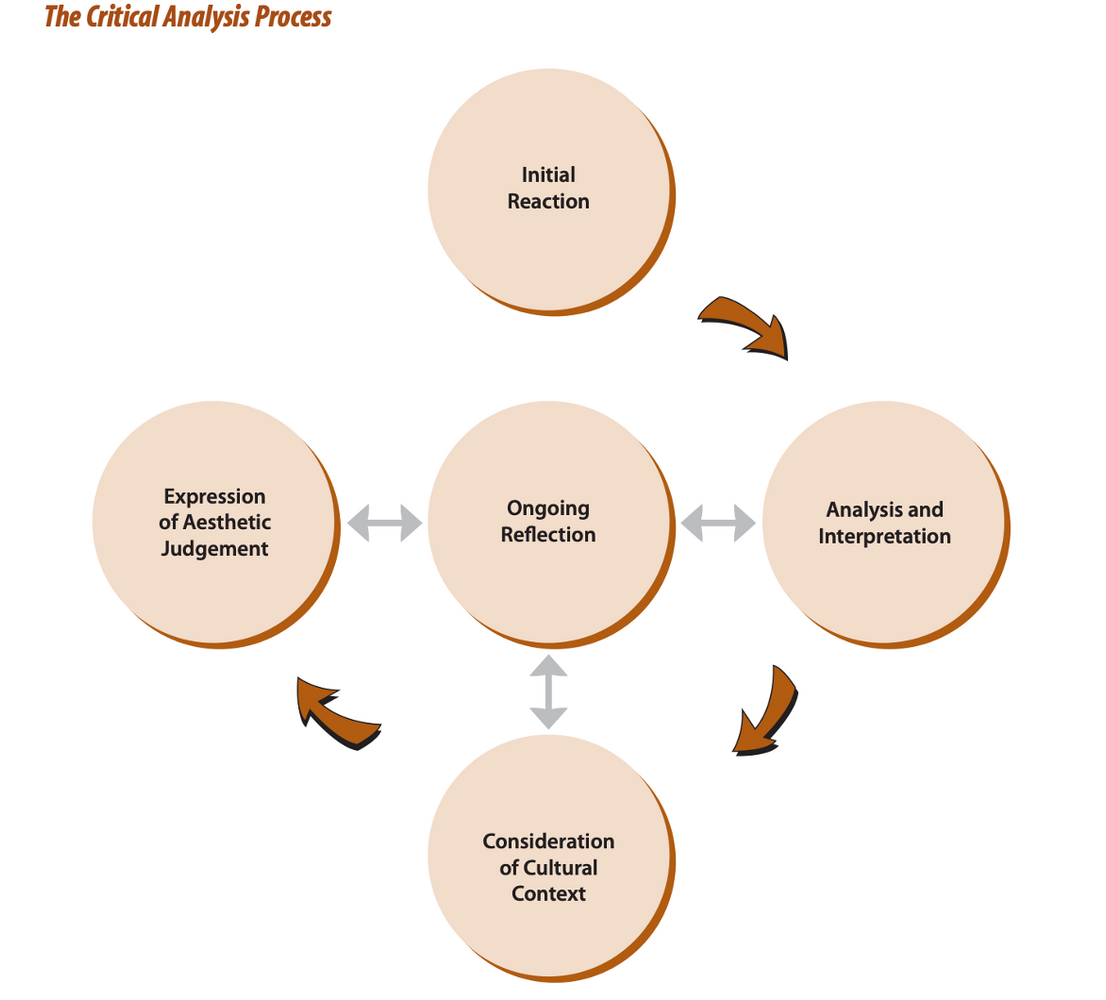
What does this all mean? We can start using the Critical Analysis process to investigate artwork and its meaning.
The critical analysis process is a flexible, non-linear process that has several stages. They are initial reaction, analysis & interpretation, consideration of cultural context, expression of aesthetic judgment, and on-going reflection. It helps us to respond knowledgeable, make connections, develop and justify our opinions and points of view. We will dig in deeper to this process in the next unit. For now, let’s focus on just our initial reaction and analysis and interpretation.
For your initial reaction, consider your first impression. What does it remind you of? What feeling or emotions does it provoke? What puzzles you?
Now, in analysis & interpretation, you are going to try to figure out what the artists did to achieve effects. You need to provide evidence for your interpretations. We can look at elements of art, principles of design, composition and techniques. We can also look at work in relationship to an art movement –like surrealism from our last learning activity. Wat message is being communicated and what tools does the artist use to express it?
Today, we will work through these stages together.
Self-portraits revisited

In the following work the artist is expressing an idea about her world and how she sees it. Look closely. What do you see? What is she trying to say?
What do the symbols relate to?
This girl is surrounded with thoughts of nature. On her head is a family of elephants spraying water from their trunks. The water is alive with fish. From her right ear, birds fly out freely. There's a star under her left eye. Her hair is a bright red and she is positioned in front of a green background. Red is associated with passion and life and green is associated with nature.
What does this all mean?
One message the artist may be communicating is that she feels a link between her love of nature and her fear of her world. The symbols communicate that she sees a lack of respect for nature and she fears the threat of extinction of some of our most precious resources. The artist is trying to say that nature and the human race are closely connected and that human beings should value their environment.
These nature symbols came to the artist in dreams. She made notes in her sketchbook and later adapted those images and ideas to create this piece.
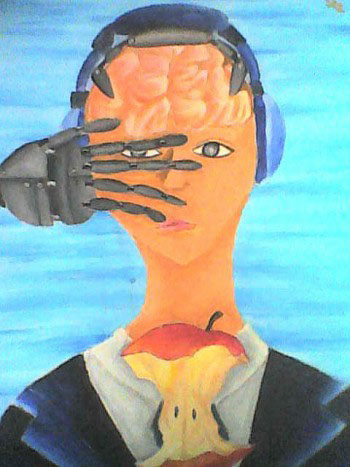
Take a look at the next work. It is surreal, but what does it say?
Inspired by René Magritte's work, expresses a duality between the world of technology and the natural world. The artist is trying to communicate that technology is clouding her vision and feels overwhelmed by its power. The painting also expresses inner conflict, as if she wants to resist this world of high-speed communication.
She is saying that her sense of sight and hearing has been targeted and changed by technology. She shows this by using the symbol of a robotic metal hand blocking an eye, headphones covering the ears, and other headgear clamped to both sides of the exposed brain. The apple is a symbol of simpler times, when communication occurred through other means. The coolness of the blue colours seems to suit the image.
The following examples are variations of the photographic portrait the student took:
- a photo of herself
- a variety of drawing techniques
- images gathered from dreams to transform her self-portrait
Self-portraits: One approach
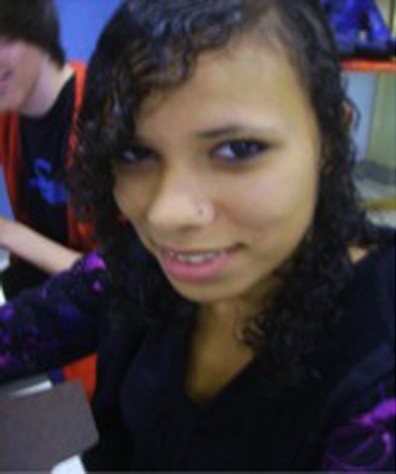
The original photo
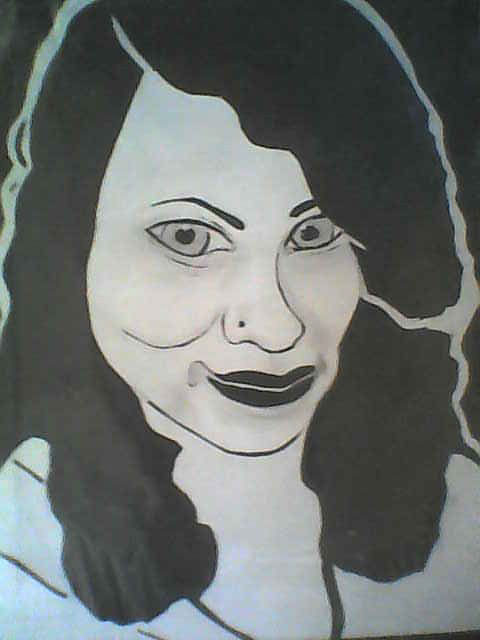
Her first step: The artist has reversed the orientation of the face and she has re-created the photo using positive and negative space.
Self-portrait: Dreams as inspiration
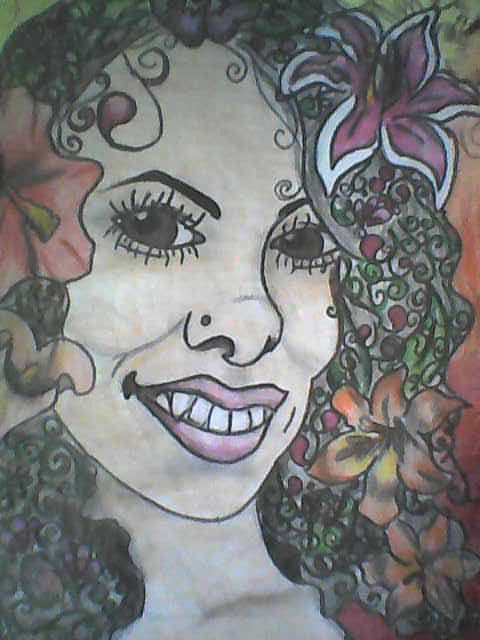
You notice that the photo has been transformed again. In this version, the self-portrait is developed with symbols and ideas from the artist's dreams. She appears as a smiling vampire, but covered in flowers, as she'd seen in a dream.
She used coloured pencils mixed with watercolours as the media in this self-portrait.
Self-portrait: Surrealism
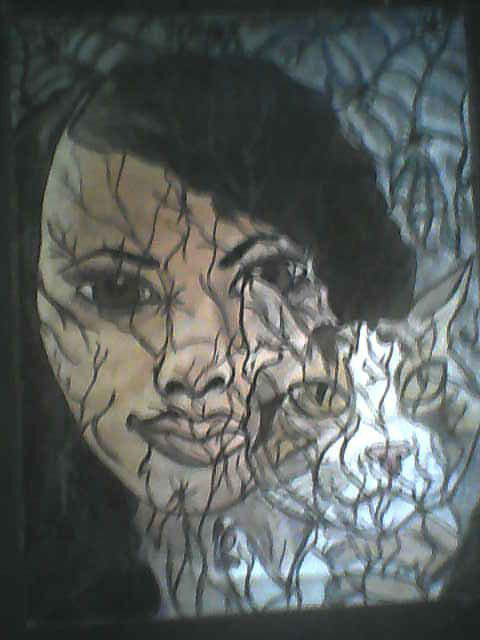
In this surrealistic image, the artist's face appears to be shattered and broken.
This portrayal expresses inner feelings of vulnerability and emotional turbulence.
Though she smiles and is comforted by a cat sitting on her lap, it looks as if she and her world are shattering.
She is surrounded by darkness.
Where have the flowers gone? What is behind her now?
A spider's web with spiders is behind her now.
How will you use a digital photo to combine it with ideas, images, and symbols from your dreams to create a surreal self-portrait?
Using the creative process
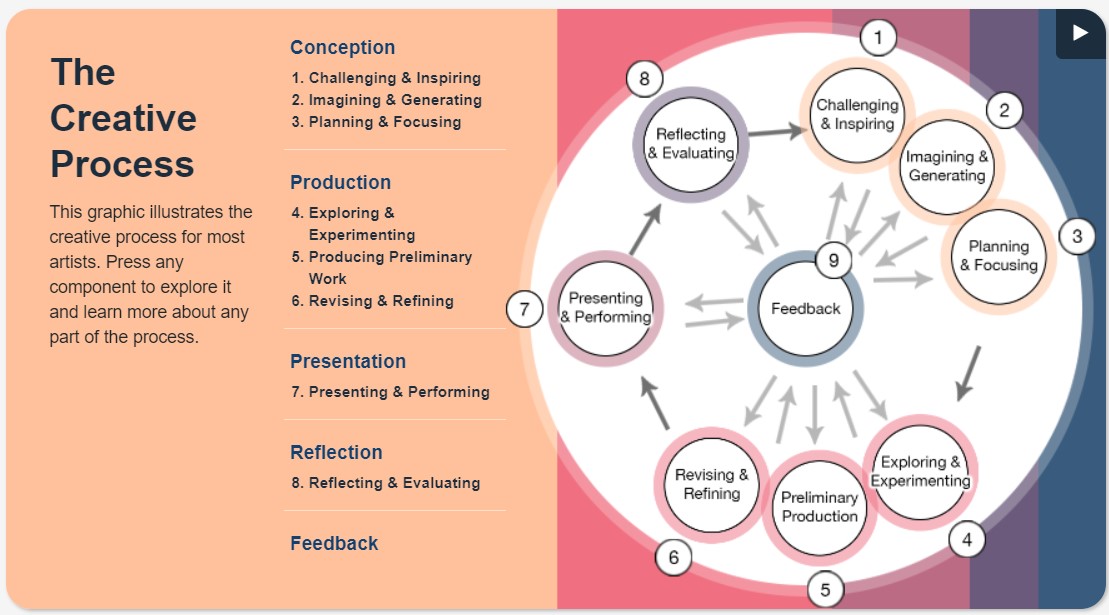
Much has been written about the creative process. It's been marveled at, sought after, and studied from the very beginnings of recorded history. We know it’s a process. The stages and steps have been identified. Yet it is so fluid and variable that trying to 'picture' it can be a challenge.
In the graphic depiction, the creative process steps are grouped into stages to give you some sense of their fluidity. Press each step in the graphic to learn about that stage of the creative process.
How to generate ideas
Think about your own creative process.
How and where do you typically start? With a big idea?
How do you move it forward? Do you do many drafts or versions?
Do you look for feedback from others at the early stages or when you're ready for the grand presentation?
Some awareness of your own creative process will help you determine what works best for you and how you might try something different.
For this project, you'll keep a record of your creative process by scanning or taking digital photos of your work as you work through the process. Remember, you are being graded on the application of the creative process to express ideas in your artwork. It is less about the finished product and more about how you get there.
In the last learning activity, you were introduced to the creative process. Let’s revisit that process and its stages.
The first two steps in the creative process are:
- challenging and inspiring
- imagining and generating
In this assessment I am providing you with the creative challenge. To create a surrealist self-portrait that communicates about your identity. Your process needs to be a response to that challenge. The learning we did together in Learning Activity 1.4 is part of the inspiring stage: you are looking at the surrealist art movement to give your inspiration for your artistic response.
You took a photo of yourself early in the course and have worked with it in a variety of ways.
- How can you generate ideas to help you transform your portrait into something surreal?
Here are some suggestions to try:
Think about your message.
- What do you want to say about this artwork?
- What is important to you?
- What value, emotion, or message would you like to communicate about yourself or your world?
Think about your bank of images from dreams.
- How can you use the symbols, ideas, and images that you’ve collected?
Think about the photos that you took of yourself.
- Which of them could serve as the foundation of a surreal self-portrait?
Look at what others have done for inspiration.
Consider making a mind map to make your thinking visible. Don’t forget to document it!
Join the discussion
Share Your Ideas
On the discussion board, share some of your ideas. In 3-5 sentences describe your initial idea or concept for the artwork. Respond to 3-4 of your peers. Provide them with feedback on the idea and make suggestions of what they might add, extend or remove. Remember, focus on the success criteria of this assessment opportunity.
Generating ideas
Examine the following gallery of surreal self-portraits from other students or revisit the Surrealist artworks you saw in the last learning activity.
Be sure to sketch your ideas or photograph works that inspire you. We sometimes call these “thumbnail drawings”. They are small, draft versions of different ideas & compositions. They help to get your ideas out. Your documentation becomes a handy reference that you can return to for ideas.


Generating ideas and creativity
When you are using the creative process, it is not a "straight ahead" sequence of steps. As you generate ideas for an artwork you'll naturally begin thinking about how you could create the artwork, what media and materials you'd use, how big it will be, and so on.
In other words, you move into the next steps in the creative process, which include:
- planning and focusing
- exploring and experimenting
- producing preliminary work
- revising and refining
In the planning & focusing stage you should begin creating a plan for your artwork by choosing ideas, determining and articulating a focus, and choosing an appropriate art form. In this assessment, you can choose between two mediums.
In the exploring & experimenting stage you should begin exploring different mediums. You might practice different techniques. You might experiment with creating different effects or drawing different parts of an image in different ways. You might experiment with textures, colour schemes, or shapes and forms.
You are NOW ready to begin a preliminary version of the work. This might be a more refined rough draft of one thumbnail drawing. It might be a really light sketch on the good copy that will be developed.
In the revision stage you should be making changes to the work in response to your own reflection, and also feedback from others.
Don’t forget. Feedback is at the center of the creative process. From who can you get feedback? Your peers? Your teacher? Family & friends? Yourself?
How can you document the feedback?
What will you apply to your work through revisions? What will you choose to leave?
When you're just starting out, choose a medium that's relatively easy to use. For the artwork in this learning activity, use coloured pencils. As an option, you might choose to work digitally. There are lots of apps out there where you can choose different pencils, change the colour, pressure, opacity, and texture (example: Procreate, Sketch club, etc.). As long as you can replicate these drawing techniques digitally, you are welcome to use one of these drawing tools. You should still do the same stages of the creative process. Don’t forget to save and label the different stages. Whenever you see “coloured pencils”, remember this can be a coloured pencil or a digital method.
Using coloured pencils
You will use coloured pencils to create your final surrealistic self-portrait. Coloured pencils are simple to use; yet there are many techniques you can practice to get the best out of this medium. For an overview of some of the tools you'll need when working with coloured pencils, watch this video by artist Angela Sasser.
Explore this!
Drawing with coloured pencils
Learn some basic techniques and tips for using coloured pencils by watching this video.
Use what you learned from the videos to fill in the blanks in “Coloured Pencil Tools and Techniques.” (Opens in new window)
Tips and techniques
In general, for each coloured area in your work:
- choose the basic colour and fill the area using layers
- for shadows, choose a darker colour in the same family of colours
- smooth and blend the layers of colours together to create richer colours and the illusion of a more even surface
- when all areas have been filled, use a lighter colour in the same family of colours, white, or a colourless blending stick to shade over the area to smooth and blend it
- intensify the shadows by applying a layer of a darker coloured pencil, such as violet or brown
Review these steps for and ensure they can be used to create diverse skin tones.
- use light to dark browns on areas for skin tones
- define the base colour with light brown or umber
- define the shadows with darker shades of brown
- blend and smooth the colours together
- use a paler colour, like peach, on top
- intensify the shadows with violet or a darker brown
- blend the colour of the skin tone area with beige or light peach
Using erasers
Kneaded erasers can be handy for removing any excess of colour without smudging the surface and for creating highlights. Plastic or rubber erasers can be used in combination with the kneaded eraser to remove coloured pencil marks.
Burnishing
Burnishing is the term used to refer to applying a layer of light colour or white over a darker colour. This blends the two together and heightens the surface impact.
Burnishing creates a smooth waxy finish as the paper becomes saturated with colour. Use burnishing sparingly, as a drawing can look "muddy" or smeared if the whole surface is burnished. Use it for final touches on the features of the face.
Notebook
Practice some of the different techniques in your sketchbook. Look at reference images or objects to help you.
Student art example
In the following work, a student applied some shading techniques in her creation of a surreal self-portrait.
She left the eyes out and removed the background to reflect emptiness. The final version could be described as a sculptural version of her digital image.


Assessment Opportunity
The creative process
You are a quarter of the way through this course. This is an Assessment Opportunity, which is an opportunity yo evaluate your work based on established criteria.
There are three tasks in this assessment opportunity.
Task 1: Create a surreal self-portrait
Creative challenge: Create a surreal pencil crayon or digital self-portrait to express 1-2 aspects of your identity. Your portrait should incorporate surrealistic imagery and the image should communicate a message about your identity to the viewer of the work by incorporating symbols. You need to consider the whole page, your composition, and different pencil crayon techniques (achieved with pencil crayons or digital drawing tools). Your focus should be on the two elements of design: value and form, and as many of the principles of composition as necessary to achieve the effect you want.
Materials
- a digital photo of yourself (upper body only)
- other digital images and symbols that interest you that could be used to express Surrealism
- a large piece of paper or a digital canvas
- pencil
- coloured or a digital tool that allows you to create pencil crayon effects (e.g.: Procreate, sketchclub, etc)
- pencils erasers
Task 2: Document your creative process in a digital slideshow (e.g.: Powerpoint, google slides).
Document your creative process with photos or scans of the following:
- brainstorming, showing your idea generation
- Thumbnail sketches showing different ideas and compositions
- Media experimentation
- Practice of a feature or detail, research, reference images or inspiration images
- final work (one photo)
- Place all of these images, including the finished artwork into a digital slideshow (such as a powerpoint or slides presentation). Label your images with the stages of the creative process. Add any reflection notes.
Task 3: Write a reflection
Reflect on this work in writing by responding to all of the following questions:
- What specific steps did you take and what specific techniques did you use to create this artwork?
- What does your final work look like? Describe in words what one would see when they look at your surreal self-portrait.
- What are you trying to express about yourself? What is the intended message?
- Why did you select these images and symbols?
- Which Surrealist artist or style did you base your work on and why?
- Which principles of art did you use and how did you use them?
- What two things do you like about your finished self-portrait?
- What challenges did you face when creating this work?
- What would you like to modify or change with respect to the elements or principles of art?
- Does your work successfully express a Surrealistic image or intent? Explain.
You will submit a slide deck (PowerPoint, google slides, etc.) converted to PDF, containing:
- a minimum of five photos of your creative process
- your reference photo for the portrait
- the finished work
- your written reflection
You may receive the following forms of feedback:
- Your teacher may highlight the phrases on the rubric that best describe your assignment to show you how you have done.
- Your teacher may also provide you with detailed comments about the strengths of your assignment, the areas of the assignment that need improvement, and the steps you should take before submitting another assignment like this one.
Pay careful attention to the following rubric. Your teacher will use it to assess your work. You should refer to it too, so you’ll know exactly what your finished assignment should appear like.
Success Criteria:
- Demonstrate an understanding of a wide variety of drawing techniques that artists use to achieve a range of specific effects.(A3)
- Demonstrate knowledge of various strategies individually to generate, explore, and elaborate on ideas and to develop and revise detailed plans for the creation of artworks that address the of creative challenges.(A1)
| Level 4 | Level 3 | Level 2 | Level 1 |
|---|---|---|---|
| With a high degree of effectiveness | With considerable effectiveness | With some effectiveness | With limited effectiveness |
Success Criteria:
- Uses the creative process to explore the creation of a Surreal self-portrait(A1)
- Deconstructs the use of elements and principles of design in their own artwork(A2)
- Describes and reflects on the qualities and success of their Surrealistic self-portrait.(B1)
| Level 4 | Level 3 | Level 2 | Level 1 |
|---|---|---|---|
| With a high degree of effectiveness | With considerable effectiveness | With some effectiveness | With limited effectiveness |
Success Criteria:
- Use the conventions of visual arts and arts vocabulary and terminology in written forms (reflection)(C2)
| Level 4 | Level 3 | Level 2 | Level 1 |
|---|---|---|---|
| With a high degree of effectiveness | With considerable effectiveness | With some effectiveness | With limited effectiveness |
Success Criteria:
- Apply the appropriate stages of thecreative processto produce and Surrealist self portrait which communicates about their identity(A1)
- Explore and experiment with media (pencil crayons or digital drawing tools), and use them to create a variety of artworks.(A3)
| Level 4 | Level 3 | Level 2 | Level 1 |
|---|---|---|---|
| With a high degree of effectiveness | With considerable effectiveness | With some effectiveness | With limited effectiveness |
The teacher will assess your work using the rubric. Before submitting your assessment, review the rubric to ensure that you are meeting the success criteria to the best of your ability.
When you are ready to submit your assessment to your teacher by pressing the "Submit Your Work" button and follow the submission direactions
Transferable skills survey
Having completed the unit, take the opportunity to review your demonstration of Ontario's Transferable Skills, introduced in 1.1. Complete the Unit 1 Transferable Skills Survey to share your assessment and specific evidence for that rating.